Windows
Installation
The ZDEW has an installer which is available for download from GitHub. Download the latest release here.
Please download Ziti.Desktop.Edge.Client-*.exe and follow the on screen instruction for installation.
Click Run Ziti Desktop Edge when installation completes.
Enrolling
Following this guide to create an identity and transfer the jwt file to your PC.
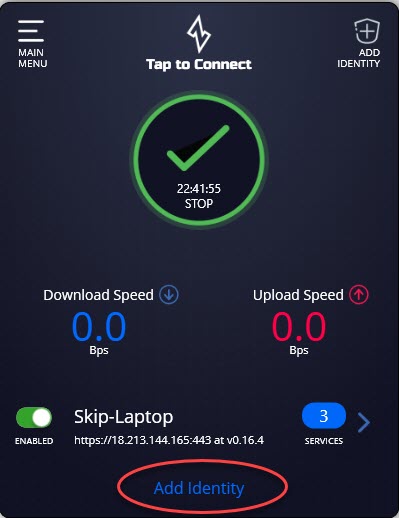
Go back to the Windows Desktop Edge widget and click ADD IDENTITY.
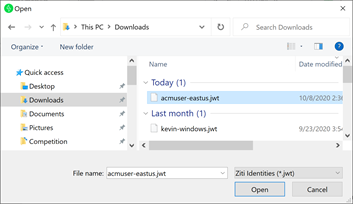
You will be brought to your file manager and should navigate to the directory where you saved the .jwt file in the previous steps. Click Open
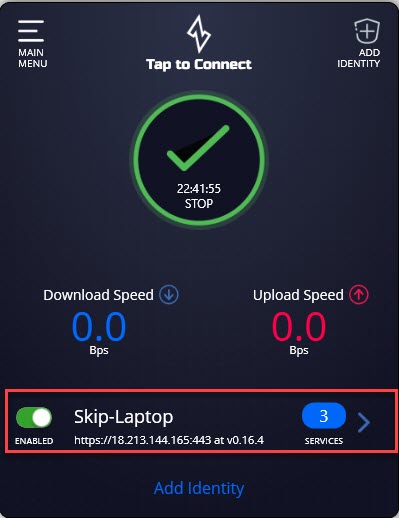
Once the identity has been enrolled and registered you will see any services you have been granted. Status = Active and the IP/Hostname/Port of rendered services.
Architecture
The ZDEW is composed of three main components: the data service, the monitor service, the UI. Communication among these processes is handled through IPC and requires the process to have been started by an interactive login.
The Data Service
The data service is the main workhorse of the ZDEW. It is built around the ziti-tunneler-sdk-c (and subsequently the
ziti-sdk-c). It is responsible for creating the "TUN" (virtual network interface) as well as for configuring any
routes necessary for IP-based intercepts.
DNS
The data service also has a DNS server listening at $TUN_IP + 1. For example, if the data service is configured to use the default IP 100.64.0.1, there will be a DNS server listening on 100.64.0.2.
The Monitor Service
This component is delivered as a Windows service and is set to automatic, delayed startup. It has two main functions: automatic upgrades and diagnostic information.
Automatic Upgrades
This service will monitor the GitHub releases for new updates. It does this every ten minutes by default but could be configured if the user wants to change this to be longer. Shorter is not recommended.
Diagnostic Information
When the ZDEW runs into problems. The UI has a 'feedback' option in the main menu to generate diagnostic information,
collect logs etc. This service performs that work resulting in a zip file saved into the logs folder.
The UI
The UI is currently a .NET UWP application. It is not necessary for this program to run for the ZDEW to function. It is exclusively for users to interact with the data and monitor services.
Logging
Logs for ZDEW are saved relative to the location of the installation. Normally this path will end up being:
C:\Program Files (x86)\NetFoundry, Inc\Ziti Desktop Edge. In that directory should be a logs directory.
The logs directory has three subdirectories for each of the main components:
- service - the logs for the data service
- ZitiMonitorService - the logs for the monitor service
- UI - the logs from the UI
Source
Managing MFA with the CLI in WSL
You can run the tunneler CLI in WSL directly instead of or in addition to running Ziti Desktop Edge for Windows (ZDEW) app.
These are the instructions for BASH in WSL to register a time-based one-time password (TOTP) token generator with the OpenZiti Controller. You could adapt these steps to Powershell to manage MFA for ZDEW with the CLI, but using the ZDEW app is easier.
Find the Identifier of the OpenZiti Identity
The ziti-edge-tunnel tunnel_status command will list the identifiers of all identities that are currently loaded. The user that runs this command, and all the ziti-edge-tunnel commands that follow, must have write permission on the IPC socket, i.e. /tmp/.ziti/ziti-edge-tunnel.sock.
Use sed and jq to parse the JSON output of ziti-edge-tunnel tunnel_status and extract the identifiers of all the loaded identities.
$ ziti-edge-tunnel tunnel_status | sed -E 's/(^received\sresponse\s<|>$)//g' | jq '.Data.Identities[].Identifier'
"/opt/openziti/etc/identities/ziti-id.json"
The identifier is "/opt/openziti/etc/identities/ziti-id.json" in this example. The identifier is computed from the value of the --identity or --identity-dir option that was used when the identity was loaded. If the --identity option was used, then the identifier is exactly the value of the --identity option. If the --identity-dir option was used, then the identifier is directory value with the path to the identity file appended. The resultant identifier could be an absolute or relative path, depending on the value given to those options.
Enable MFA
Initiate MFA registration and obtain a set of recovery codes by running the enable_mfa command.
$ ziti-edge-tunnel enable_mfa --identity /opt/openziti/etc/identities/ziti-id.json
received response <{"Success":true,"Data":{"Identifier":"/opt/openziti/etc/identities/ziti-id.json","IsVerified":false,"ProvisioningUrl":"o
tpauth://totp/ziti.dev:ziti-id?issuer=ziti.dev&secret=JUDCEDGDOASN6JCO","RecoveryCodes":["2CRGME","3NZXX5","BRBFYQ","C7CG6H","DHF4WI","DPC5
DV","GCXNZX","JHVBDG","JWPKN5","KZRLVZ","L5VO6J","LLPG3U","NJ22N2","NMVG46","RAG2QV","TA6J3R","XVGRRF","Z2TGWZ","ZDW6Y7","ZEOEPL"]},"Cod
e":0}
>
Create a Token Generator
In the TOTP app of your choice, create a new token generator using the seed from the ProvisioningUrl field of the response. The seed is the value of the secret query parameter in the URL.
Verify MFA
Complete MFA registration by verifying you have received the TOTP seed.
$ ziti-edge-tunnel verify_mfa --identity /opt/openziti/etc/identities/ziti-id.json --authcode 193754
received response <{"Success":true,"Code":0}
>
Submit MFA
Whenever MFA is needed, you must submit an MFA token to the OpenZiti Controller before OpenZiti Services will be available. Submit MFA by running the submit_mfa command.
$ ziti-edge-tunnel submit_mfa --identity /opt/openziti/etc/identities/ziti-id.json --authcode 910082
received response <{"Success":true,"Code":0}
>
Troubleshooting
OpenZiti Services are Unavailable
The OpenZiti Tunnel will require a new MFA token after the system service is restarted or the session has expired. OpenZiti Services will be unavailable when MfaNeeded=true until MFA is submitted. Submit MFA by running the submit_mfa command. You can diagnose this condition by running the tunnel_status command and checking the MfaNeeded field.
$ ziti-edge-tunnel tunnel_status | sed -E 's/(^received\sresponse\s<|>$)//g' | jq '.Data.Identities[]|select(.Identifier == "/opt/openziti/etc/identities/ziti-id.json")|.MfaNeeded'
true
MFA Commands get "Permission Denied"
The user that runs the ziti-edge-tunnel commands must have write permission on the IPC socket, i.e. /tmp/.ziti/ziti-edge-tunnel.sock. If you installed the tunnel program with a Linux package then a permission group named "ziti" was created for you. Otherwise, you must create and join group "ziti."
MFA Commands get "Connection Refused"
The ziti-edge-tunnel daemon must be running. Start the daemon by running the run command. Older versions of the tunnel placed the IPC socket in /tmp/ziti-edge-tunnel.sock. Newer versions place the socket in /tmp/.ziti/ziti-edge-tunnel.sock. If you are using an older version of the tunnel, you must update to the latest version.