MacOS
Installation
Install the Ziti Desktop Edge from the Mac App Store
If you already have Ziti Desktop Edge for Mac installed and you are updating it, please make sure to turn off your Ziti Desktop Edge for Mac before updating it
And after the download and installation is complete, click on open
Enrolling
Following this guide to create an identity and transfer the jwt file to your MAC.
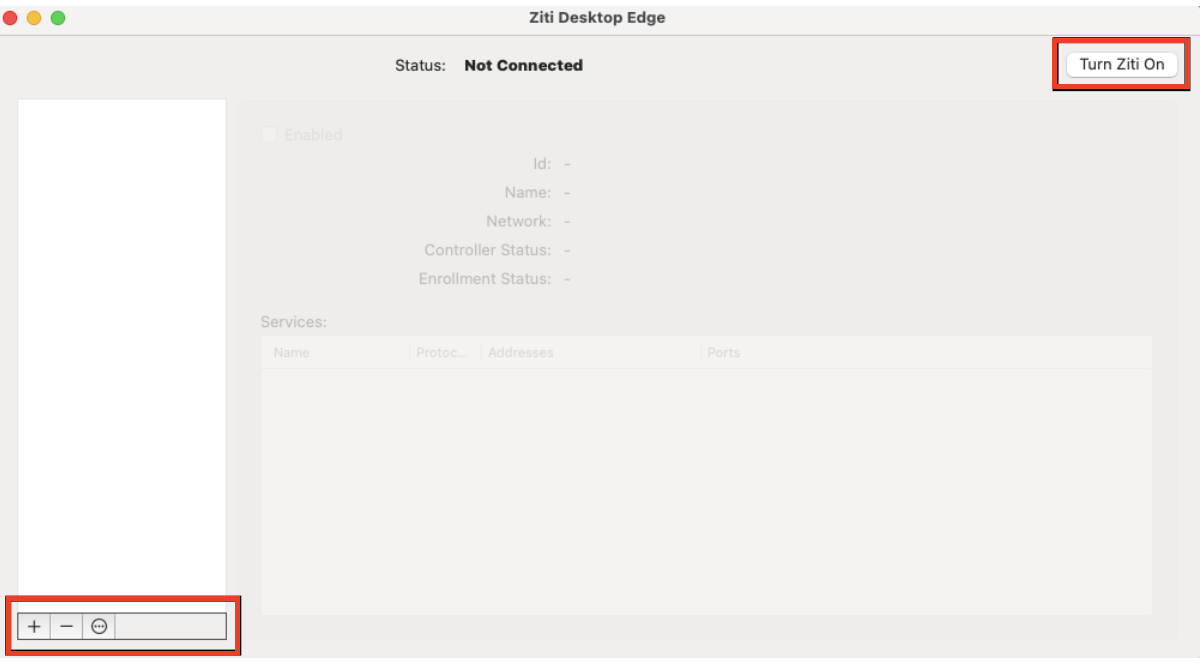
From the Ziti Desktop Edge for Mac UI, click on Turn Ziti On. Add an identity by clicking the + in the lower left of the UI. Choose the jwt downloaded to your Mac in the previous step.
Find and select the downloaded jwt file and then click on Open

In the left side list, the added jwt will be displayed. Finish the enrollment process by clicking the Enroll button.

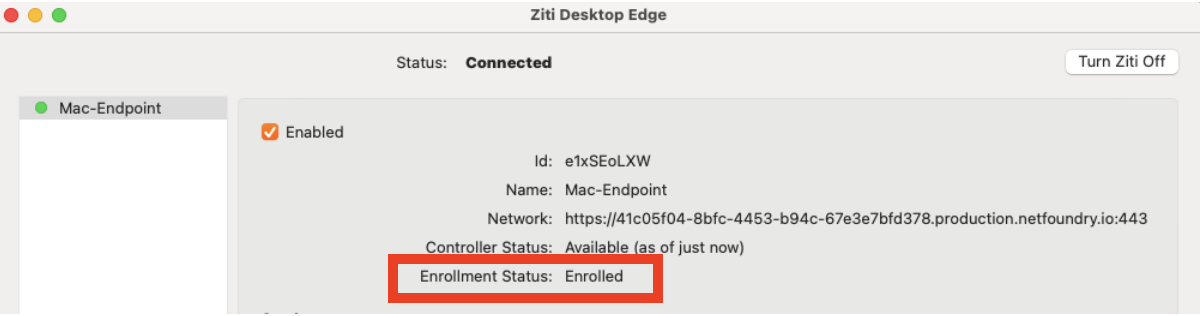
The Enrollment Status will show Enrolled once it's completed. Once the identity has been enrolled, the Ziti Desktop Edge for Mac UI will display the services authorized for the identity.
Managing MFA with the CLI
The tunneler CLI is installed automatically with the Ziti Desktop Edge for Mac. The tunneler CLI can be used to manage MFA separately from Ziti Desktop Edge for Mac.
Using Terminal.app, complete the following workflow to register a time-based one-time password (TOTP) token generator with the OpenZiti Controller.
Find the Identifier of the OpenZiti Identity
The ziti-edge-tunnel tunnel_status command will list the identifiers of all identities that are currently loaded. The user that runs this command, and all the ziti-edge-tunnel commands that follow, must have write permission on the IPC socket, i.e. /tmp/.ziti/ziti-edge-tunnel.sock.
Use sed and jq to parse the JSON output of ziti-edge-tunnel tunnel_status and extract the identifiers of all the loaded identities.
$ ziti-edge-tunnel tunnel_status | sed -E 's/(^received\sresponse\s<|>$)//g' | jq '.Data.Identities[].Identifier'
"/opt/openziti/etc/identities/ziti-id.json"
The identifier is "/opt/openziti/etc/identities/ziti-id.json" in this example. The identifier is computed from the value of the --identity or --identity-dir option that was used when the identity was loaded. If the --identity option was used, then the identifier is exactly the value of the --identity option. If the --identity-dir option was used, then the identifier is directory value with the path to the identity file appended. The resultant identifier could be an absolute or relative path, depending on the value given to those options.
Enable MFA
Initiate MFA registration and obtain a set of recovery codes by running the enable_mfa command.
$ ziti-edge-tunnel enable_mfa --identity /opt/openziti/etc/identities/ziti-id.json
received response <{"Success":true,"Data":{"Identifier":"/opt/openziti/etc/identities/ziti-id.json","IsVerified":false,"ProvisioningUrl":"o
tpauth://totp/ziti.dev:ziti-id?issuer=ziti.dev&secret=JUDCEDGDOASN6JCO","RecoveryCodes":["2CRGME","3NZXX5","BRBFYQ","C7CG6H","DHF4WI","DPC5
DV","GCXNZX","JHVBDG","JWPKN5","KZRLVZ","L5VO6J","LLPG3U","NJ22N2","NMVG46","RAG2QV","TA6J3R","XVGRRF","Z2TGWZ","ZDW6Y7","ZEOEPL"]},"Cod
e":0}
>
Create a Token Generator
In the TOTP app of your choice, create a new token generator using the seed from the ProvisioningUrl field of the response. The seed is the value of the secret query parameter in the URL.
Verify MFA
Complete MFA registration by verifying you have received the TOTP seed.
$ ziti-edge-tunnel verify_mfa --identity /opt/openziti/etc/identities/ziti-id.json --authcode 193754
received response <{"Success":true,"Code":0}
>
Submit MFA
Whenever MFA is needed, you must submit an MFA token to the OpenZiti Controller before OpenZiti Services will be available. Submit MFA by running the submit_mfa command.
$ ziti-edge-tunnel submit_mfa --identity /opt/openziti/etc/identities/ziti-id.json --authcode 910082
received response <{"Success":true,"Code":0}
>
Troubleshooting
OpenZiti Services are Unavailable
The OpenZiti Tunnel will require a new MFA token after the system service is restarted or the session has expired. OpenZiti Services will be unavailable when MfaNeeded=true until MFA is submitted. Submit MFA by running the submit_mfa command. You can diagnose this condition by running the tunnel_status command and checking the MfaNeeded field.
$ ziti-edge-tunnel tunnel_status | sed -E 's/(^received\sresponse\s<|>$)//g' | jq '.Data.Identities[]|select(.Identifier == "/opt/openziti/etc/identities/ziti-id.json")|.MfaNeeded'
true
MFA Commands get "Permission Denied"
The user that runs the ziti-edge-tunnel commands must have write permission on the IPC socket, i.e. /tmp/.ziti/ziti-edge-tunnel.sock. If you installed the tunnel program with a Linux package then a permission group named "ziti" was created for you. Otherwise, you must create and join group "ziti."
MFA Commands get "Connection Refused"
The ziti-edge-tunnel daemon must be running. Start the daemon by running the run command. Older versions of the tunnel placed the IPC socket in /tmp/ziti-edge-tunnel.sock. Newer versions place the socket in /tmp/.ziti/ziti-edge-tunnel.sock. If you are using an older version of the tunnel, you must update to the latest version.